4 rules to build the perfect splash page for your WiFi hotspot
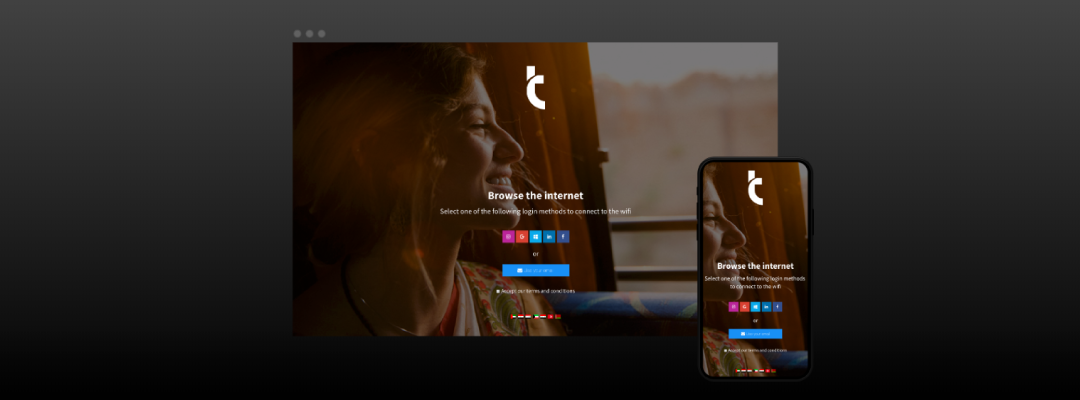
Tanaza features a splash page editor that allows in few minutes the WiFi network administrator to create and customise the authentication page of a public hotspot. In this article, you will find the 4 rules to create an effective splash page for your WiFi users in order to leverage your WiFi network.
Easy and fast access to the WiFi network
When users visualise the splash page, you have a few seconds to convince them to log in. Accessing your public hotspot should not require too many efforts otherwise, you are taking the risk to loose potential WiFi users.
The best way to obtain an effective splash page is to make it simple and easy to use.
Don’t add too many items, focus on the essential
When creating a splash page, be careful not to confound simplicity with shortage otherwise, you could lose WiFi users with too many information on the landing page. This happens because we don’t respect a few design rules.
But which are these four design rules for an effective splash page?
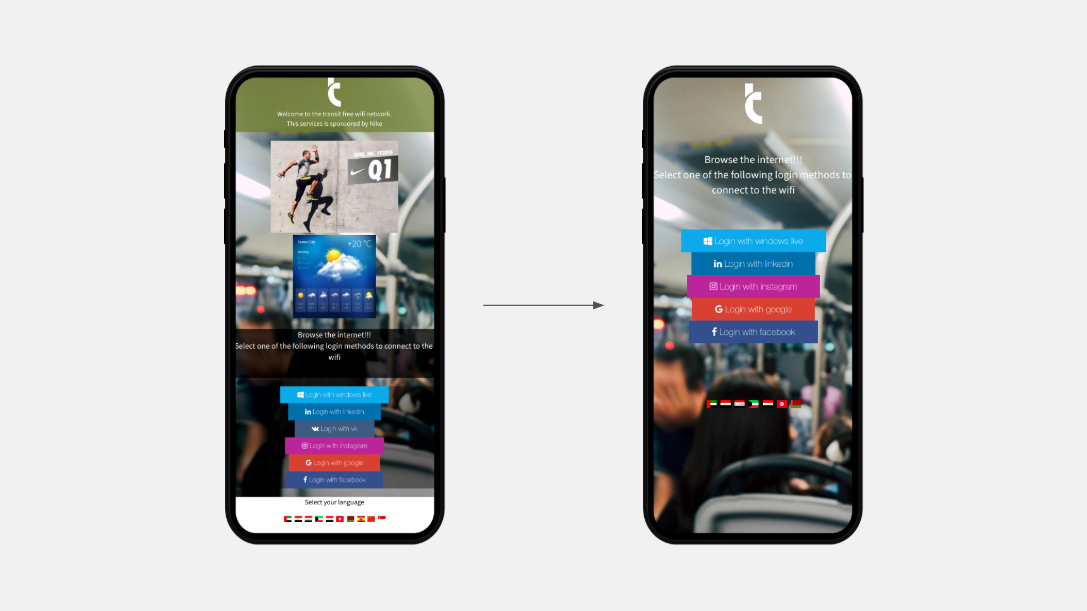
1. Do not add too much content to the WiFi splash page
Less is more is the universal good design rule.
By putting just a few contents in the splash page you allow them to focus on the essentials items and you make the UI intuitive and immediate. When users click on your WiFi network name to access the internet, they expect a fast and easy way to log in.
Instead, they often deal with too complex pages, with too much information, which makes the login process too long and complex.
Add to the WiFi splash page only the essential items: logo, a welcome text, a few login methods. If you need users to accept your terms and conditions, ask your legal consultant to reduce the amount of text to a minimum (eventually link to the full text of terms and conditions).
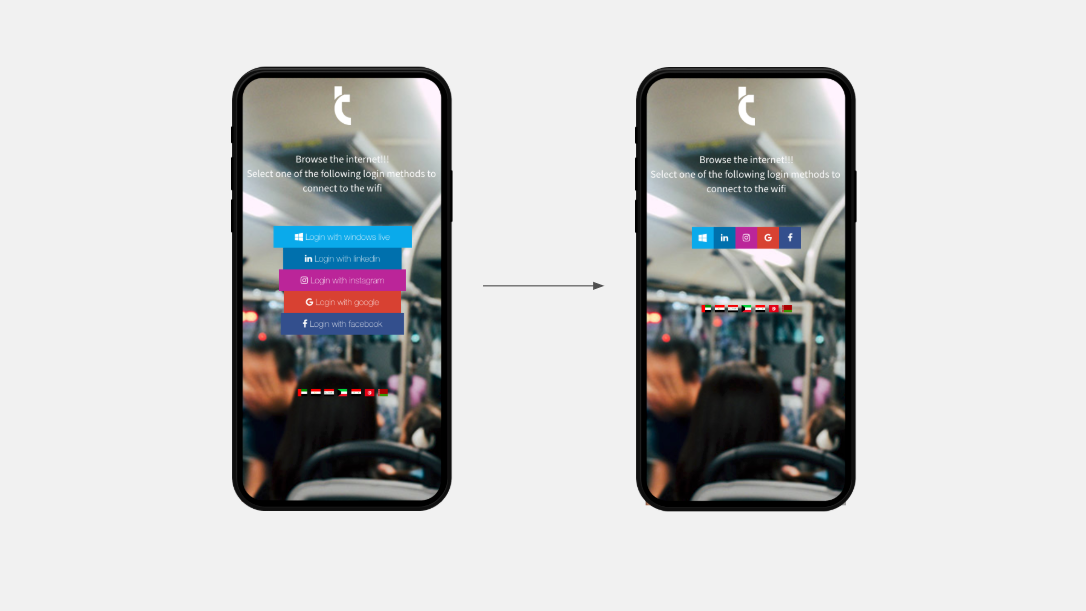
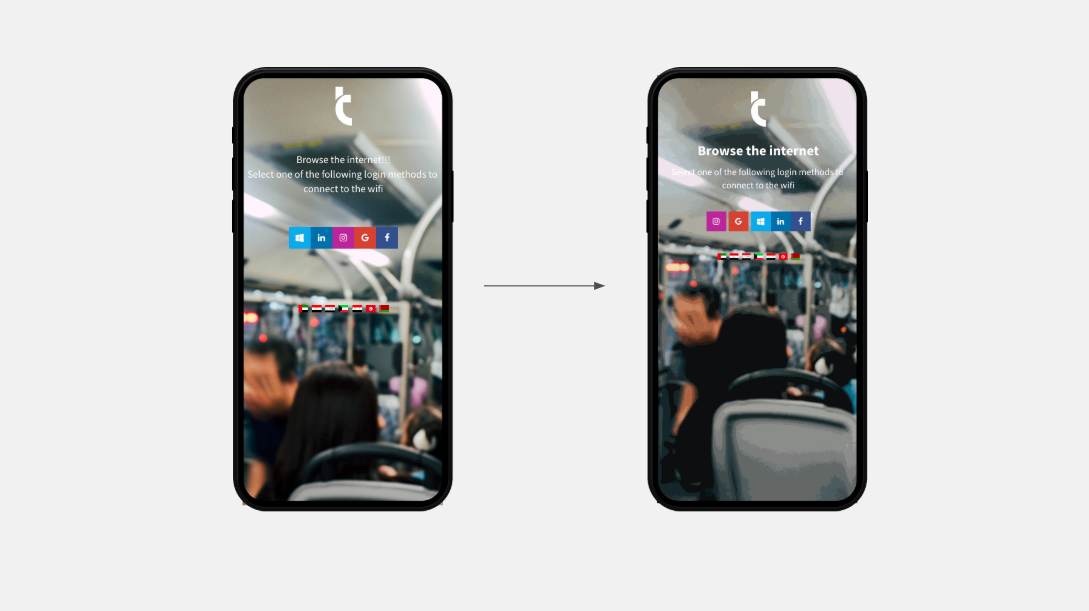
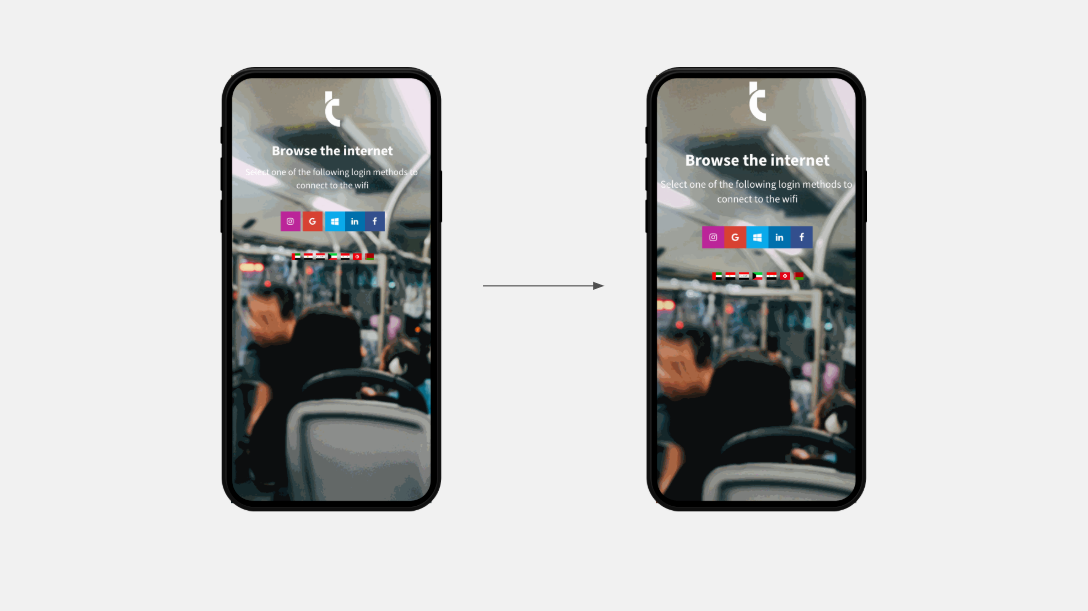
2. Use a few colours in your WiFi splash page The human mind needs time to elaborate the information, and this takes some effort. A splash page with five colours is more complex to understand than one with just one or two colours. Using a few colours, you allow users to relax and focus, making the WiFi access easier.
Choose monochromatic backgrounds or simple images, with just a few items and a uniform colour set. If you use many login methods (e.g. three social login methods) reduce the amount of space that each button takes, so that the page is less coloured.
3. Focus the attention on key elements
To make your splash page more intuitive, use some tricks to focus users on the most important elements.
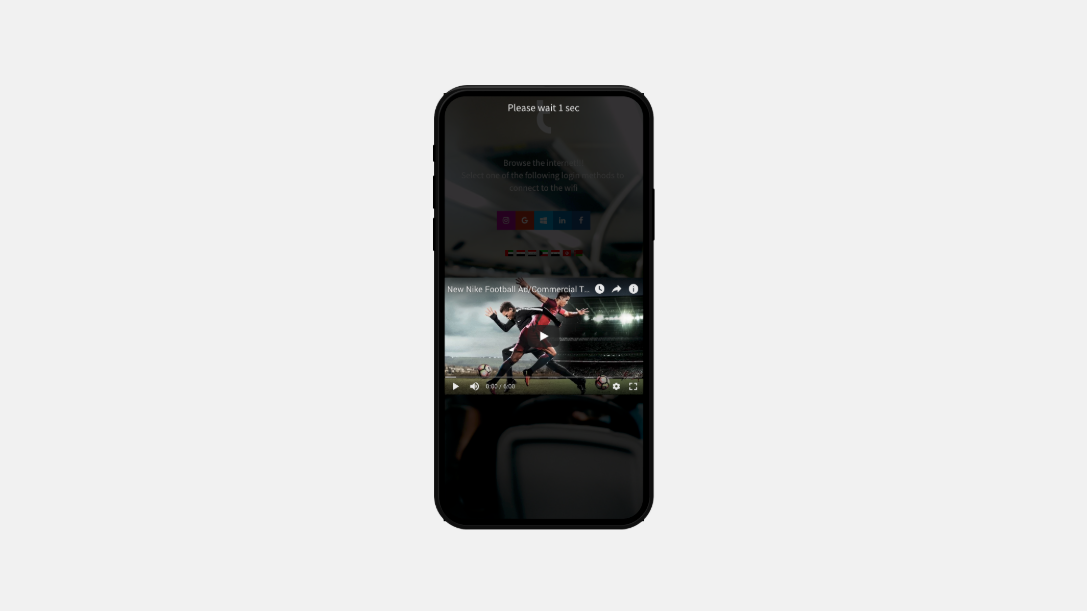
Use the advertising tool to publish ads on your WiFi splash page
Use the Tanaza advertising tool to show advertising banners and videos. This way, you will focus your users’ attention on the show!
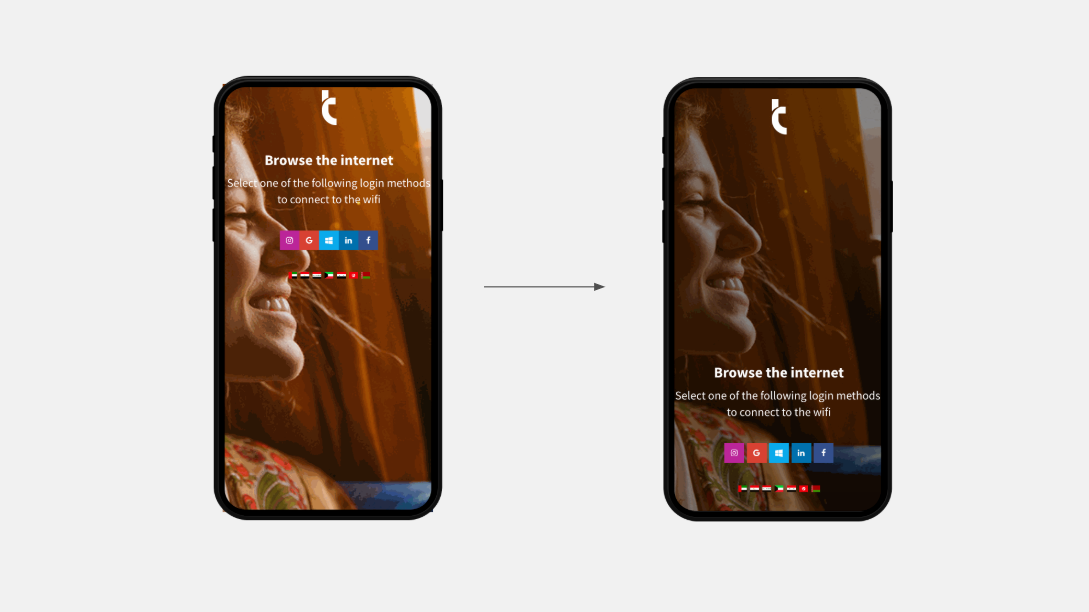
Use bold for titles
Help users to quickly examine the content in your page. Bold your titles (the most important message) and eventually complete the message with a normally formatted text. Using bold titles helps users read your message and login instructions.
Put some space between the elements
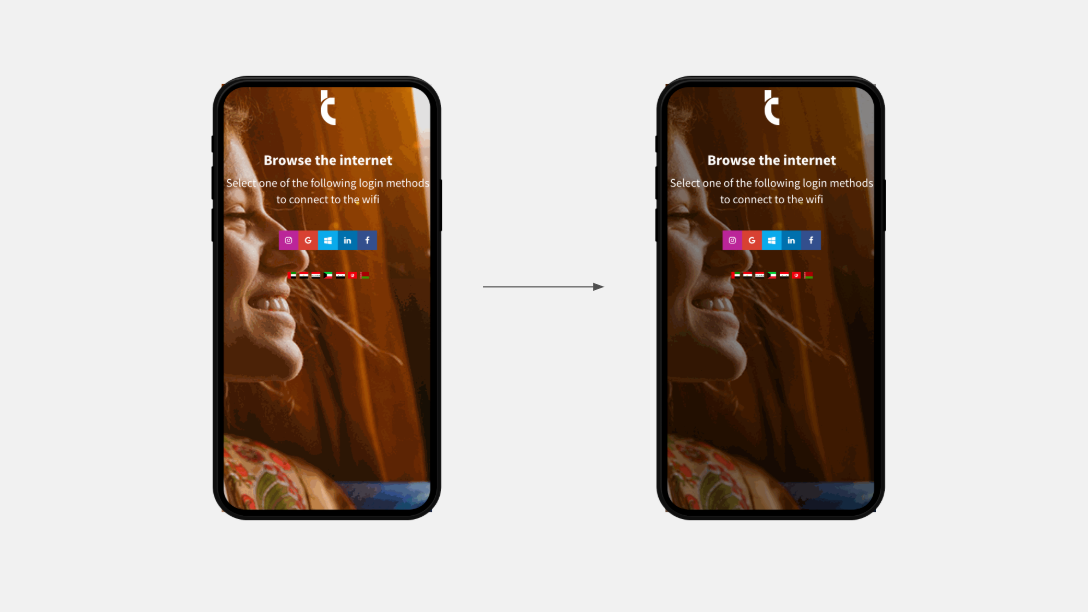
As in a book, distinguish the various elements in the splash page with some space and interline. Using white space helps to focus the users’ attention on single elements, such as your logo, text, or buttons.
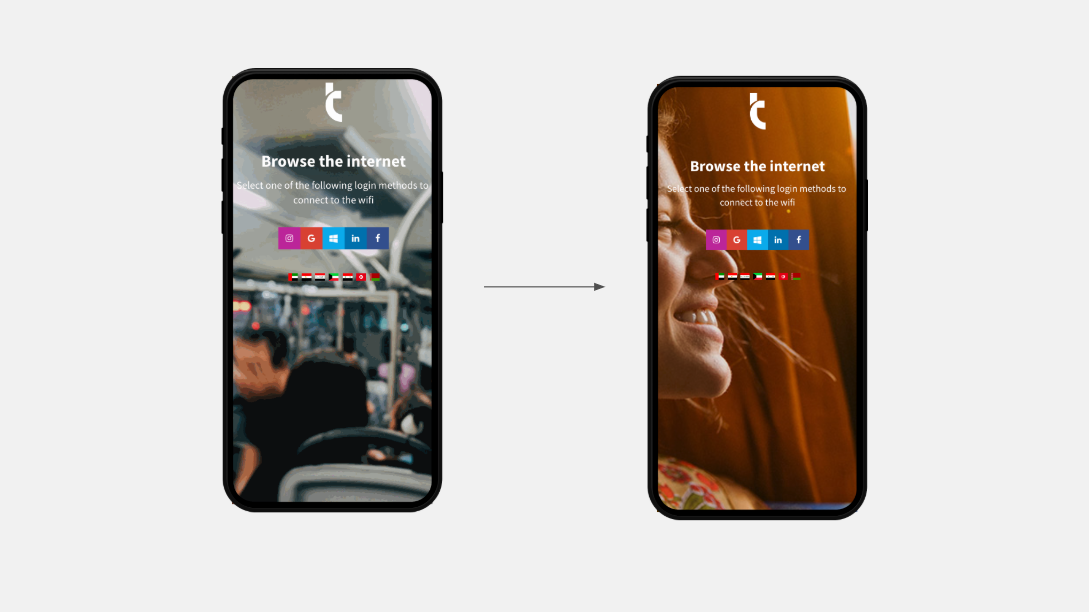
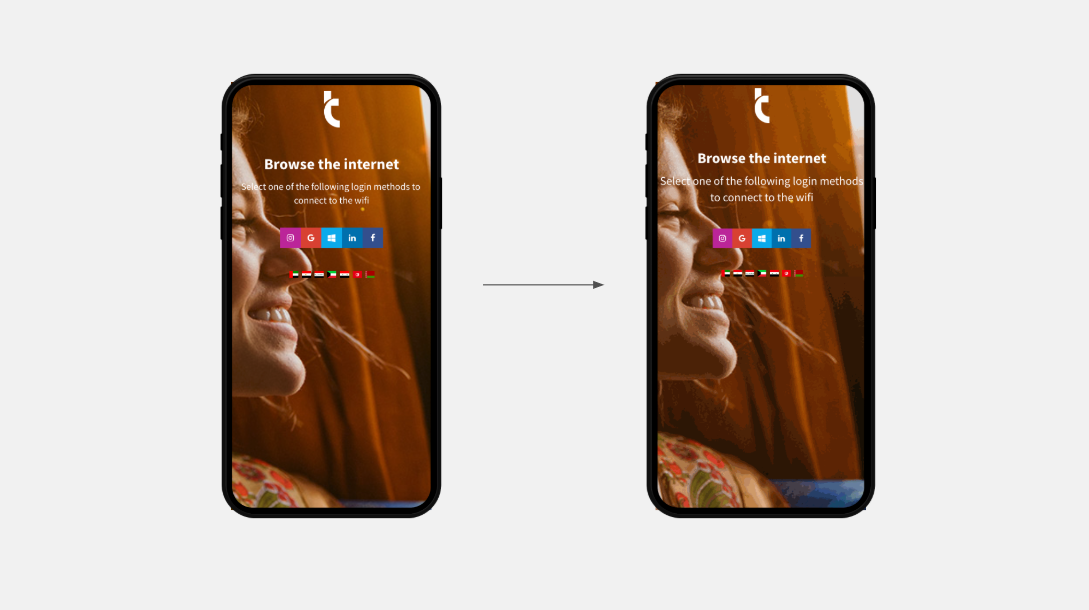
Use images with a clear meaning
Don’t use images as a decoration, instead choose images that reflect the message you want to send and your brand image. Or, use them to drive emotions (e.g. the image of a smile, or a sunset).
4. Make your Wifi login page accessible
Make your WiFi splash page easy to access for anyone. Small text fonts, clear colours, or small buttons (hard to click from mobile devices) make the login experience too complex for someone.
How to make a WiFi splash page accessible?
Make the text readable
Use a larger font size, at least 20pt. Don’t try to be original by using complex font, for example, a font simulating handwriting, as they are less easy to read and less intuitive.
Create some contrast
Use a clear colour for text on a dark background, or the opposite. Create contrast by making the whole page clearer or darker and don’t use coloured rectangles under the text.
Create contrast between elements: if you use blue login buttons, use a red or yellow background.
Move buttons to the bottom
Make the experience better for mobile device users. Put the elements at the bottom by using the footer component in the Tanaza splash page editor, you’ll make the click from mobile devices easier.
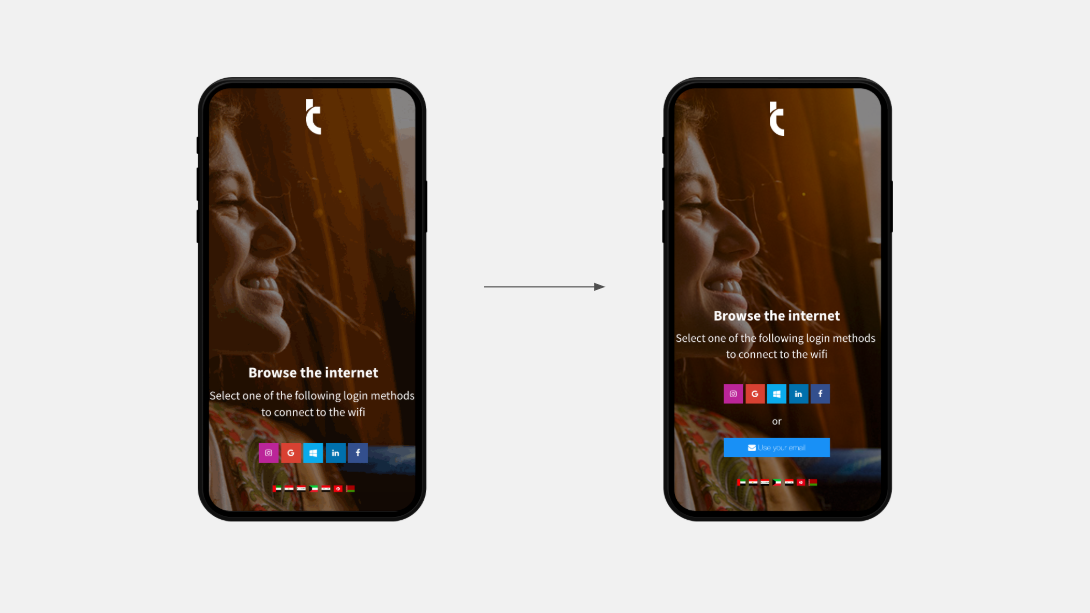
Offer a way-out
If you use a social login method, offer an alternative method of authentication via email. Not all people have a social account or want to use it; some might prefer the email, instead.
Conclusion
Creating an effective splash page is not hard. Do not fill it with stuff: use just a few images, a few colours, a small amount of text and a few login methods.
Focus the attention on the key elements and make the UI simple, by using less colours. Make it also accessible, by using a large font size, contract, and moving buttons to the bottom.
If you want to collect users’ data through WiFi, use social login together with another authentication method such as the email login.
If you want to comment on this article, for example by adding your own examples of splash pages, we’ll be happy to provide some feedback!
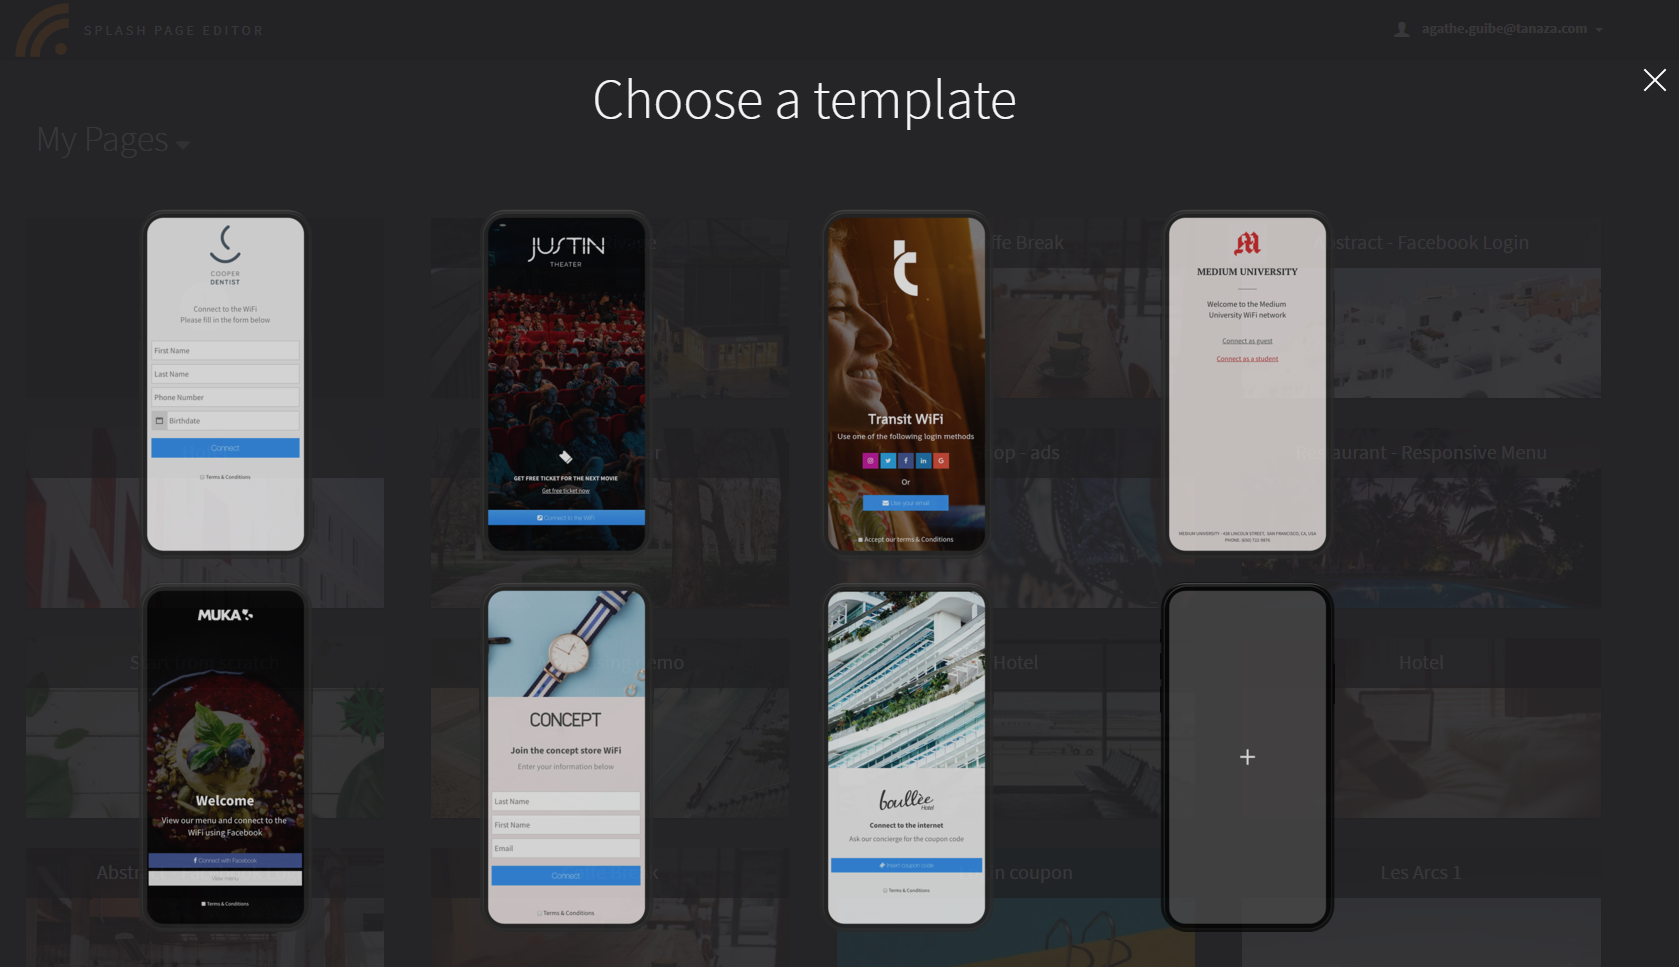
The editor’s drag and drop system enables WiFi network administrators to create in a few clicks their splash page by adding a logo, a text, their preferred authentication methods, and redirection links to external landing pages, to name a few. The landing page can also be configured in multiple languages.
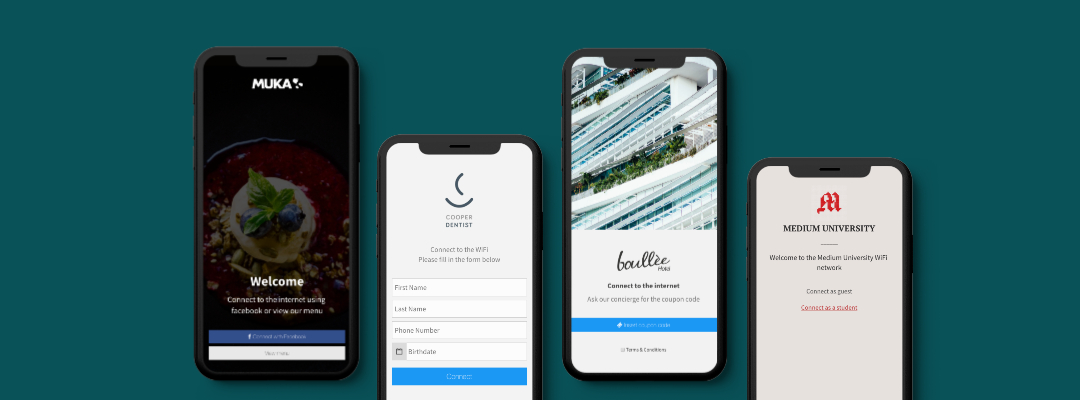
In the past, many of our customers have asked for our help when building their splash page – mostly for tips and tactics on how best to engage their WiFi users. With this in mind, we recently released new templates on the splash page editor to help get them started and give them some inspiration.
These models show you pre-designed splash pages, mobile friendly, that you can easily modify by substituting the elements with your logo, image, text and so on.
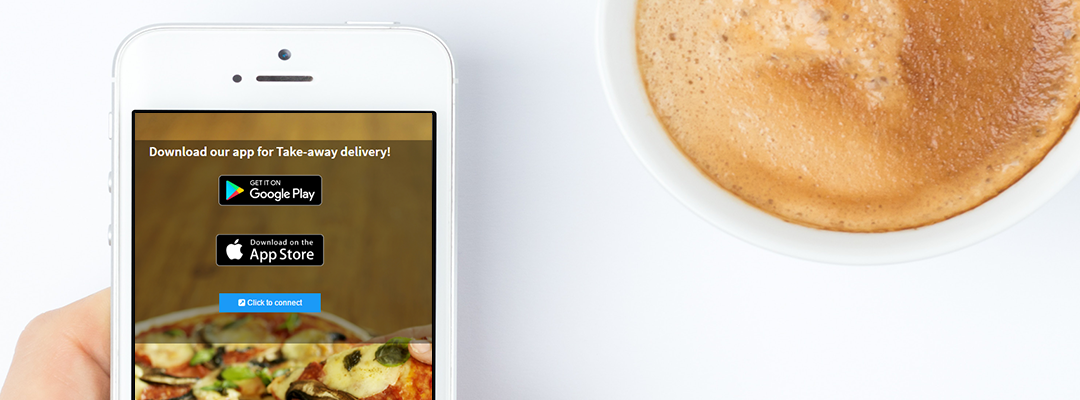
Tanaza features a captive portal, allowing WiFi network administrators to create and customise splash page for public hotspots. Indeed, Tanaza splash page editor gives the opportunity to owners of a venue to promote and deliver additional services to WiFi users. There are many ways to leverage the splash page of a public hotspot, such as for example encourage WiFi users to download an application, leave a TripAdvisor review, follow a Facebook page or redirect them to another website.
By simply creating a redirection button to the download platform of an app (iTunes Store for iOS or Google Play Store Android) on the Tanaza splash page, a hotspot administrator can redirect WiFi users and offer them additional services. For example, a museum could promote its audio-guide application on its splash page, a restaurant could promote its “take-away” service application and a brand could promote its e-commerce app to people that are in its fashion retail shop.
Tanaza allows restaurant owners to increase their visibility on review platforms such as Tripadvisor, Zomato, Yelp, etc. Indeed, WiFi network administrators can customise the splash page, adding a redirection button or image to the restaurant TripAdvisor page. The idea is to encourage clients to leave a review about their experience in exchange for free WiFi. Another marketing idea could be to ask for a review on Tripadvisor in exchange for a free café for example.
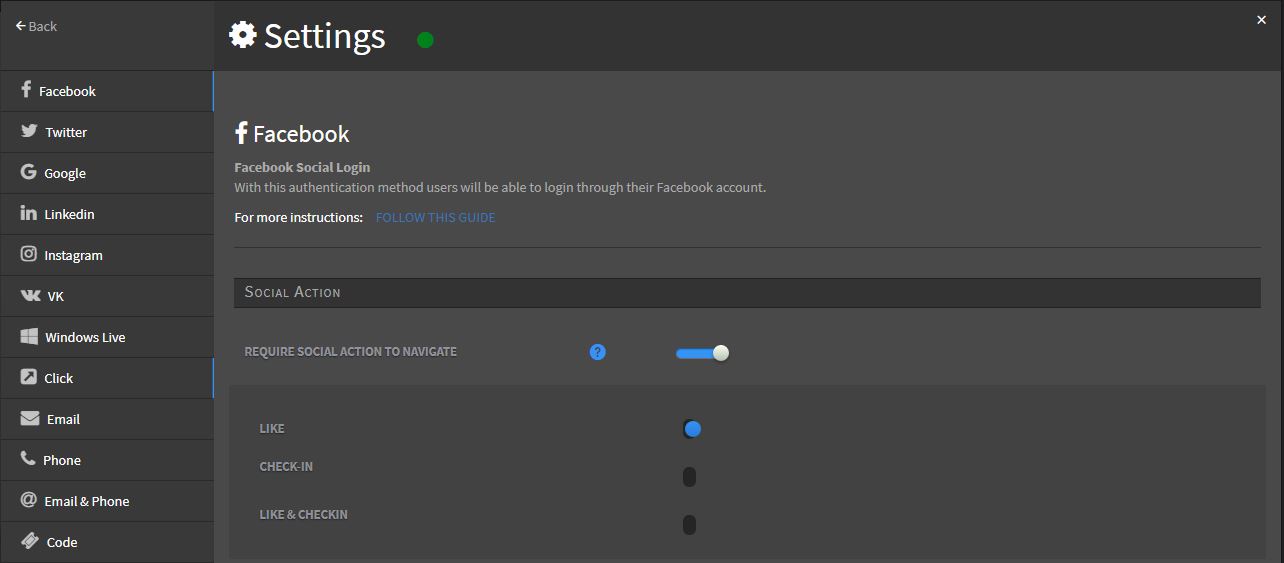
When accessing a WiFi network, users have oftenthe possibility to connect using their social media account such as Facebook. In this case, a WiFi network administrator could ask them to like a page or to geolocate themselves in a location on Facebook. This allows the owner of a venue to increase his social visibility and to engage with more customers. To do this, simply enable the option “social actions” on the splash page settings.
We recommend you to ask whether for a Like or a Check-in to WiFi users. Indeed, there are three options when using social actions with the Tanaza hotspot system:
the first one is the Like only;
the second one is the Check-in only;
the third one is asking for a Like and a Check-in to WiFi users;
One possible scenario is that the user is asked for a “Like”, then connects to the internet. When connecting the second time to the network, depending on the settings, he’s asked again for the “Like” (if not done) or he’s asked for a check-in in a specific place. Find more information about how you should communicate about social actions in this article.
Tanaza allows WiFi network administrators to configure an external splash page and deliver additional services to WiFi users y adding an external radius server on top of the Tanaza infrastructure. This function is really useful in scenarios like in a supermarket, where the WiFi administrator sets up the social login or a login through a fidelity card.
Also, the external splash page can be used when WiFi administrators want to enable their own splash page or SMS gateway different from the Tanaza’s one.
To conclude, customising the splash page of a public hotspot is a fundamental step in the communication and marketing plan of any businesses willing to promote and deliver additional services to their customers. It allows businesses to offset costs of the WiFi infrastructure but also to enhance the final experience of their users.
Let’s suppose that you were asked to deploy a Wi-Fi network in a restaurant and that your customer wants to collect their Wi-Fi clients’ data to promote their events and special evenings.
In order to collect this type of data easily and quickly, we encourage network admins to enable an easy way for users to login to the Wi-Fi, avoiding complex and long forms to fulfill.
There are two preferred social login flows to achieve this:
Facebook login
Facebook social actions (Like or Check-in)
Facebook login
This social login flow consists of asking Wi-Fi clients to “Log in with Facebook.
UX: After connecting to the Wi-Fi, the Wi-Fi clients will see a splash page, that can be customized with the customer’s logo, their preferred background, and type of advertising. In order to log into the network, they must click the button “Log in with Facebook” on the splash page which will give Facebook permission to access their data. If they accept to provide their complete anagraphic information (or a part of them) to the app “Access Internet”, they will connect to the internet.
PROS: No complex permission needed, no Facebook review needed. Super-easy login flow for the user. You can collect user data (name, surname, hometown location – country and city, birthday, e-mail, age, gender).
CONS: Because not everyone has a Facebook account, you should enable an alternative way to log in (e.g. e-mail, Twitter, Google+).
How user authentication works with Tanaza’s access points and captive portal
In this article, you will learn about the steps needed to authenticate users on your captive portal through Tanaza’s access points, together with the most used authentication processes enabled by Tanaza (Facebook login, etc.).
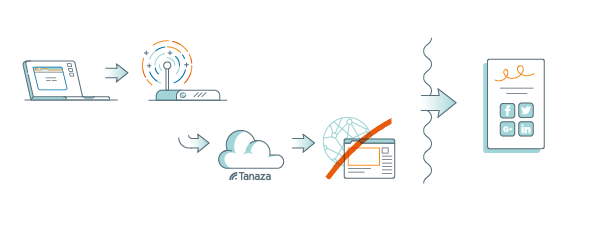
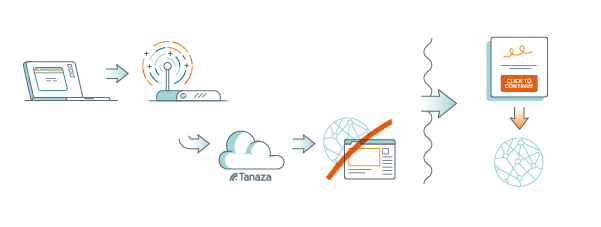
Tanaza is a software that allows network admins to manage user authentication in a very intuitive way through the configuration of a customizable captive portal. A captive portal is the web page people see before accessing a public Wi-Fi network, i.e. when they use the free Wi-Fi connection of a bar, restaurant, hotel, shop, etc. At first, when clients try to log in to your Wi-Fi to browse a webpage, they are unauthenticated. Being unauthenticated means that their access to your network is limited to the captive portal, other than content and services included in the Walled Garden. To learn more about which websites and URLs are accessible by a client before authentication read this article. On the captive portal, users can then authenticate themselves and browse the web on their Wi-Fi-enabled devices. Let’s now see the steps needed to authenticate users on a captive portal and the main login methods featured by Tanaza.
Opening of the login page of the captive portal
Clients’ login flow starts in this way: the unauthenticated user’s device reaches your access point and requests access to the Internet. The access point, that is connected to the Tanaza Cloud, sees the request but doesn’t recognize the client as authenticated. Accordingly, instead of showing the user a web page, it redirects the unauthenticated user to the login page, aka your captive portal. Once here, the user authenticates through the captive portal and is therefore authorized to browse the web. Now, the user can freely browse any webpage, using your Wi-Fi network. To better understand how to use the Tanaza captive portal functionality, read this article.
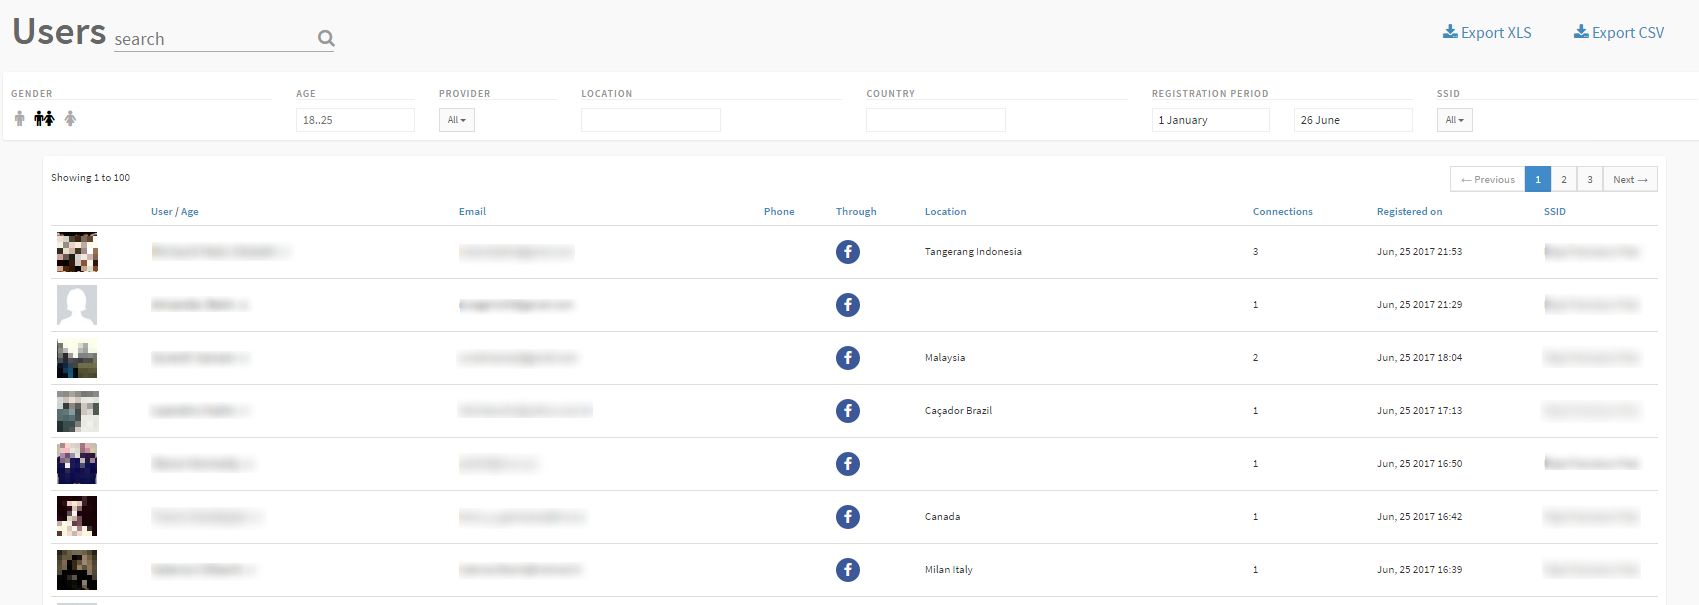
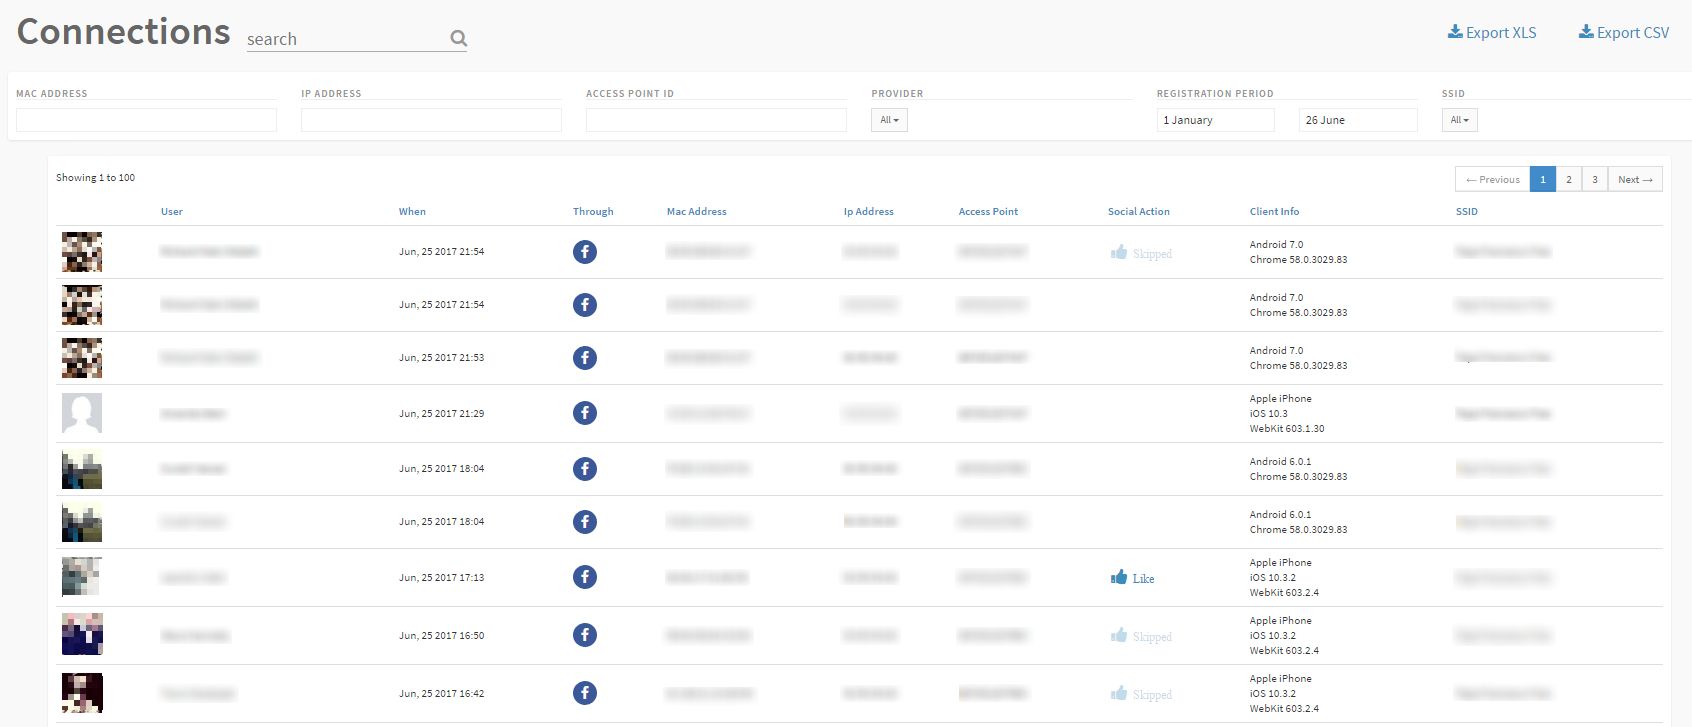
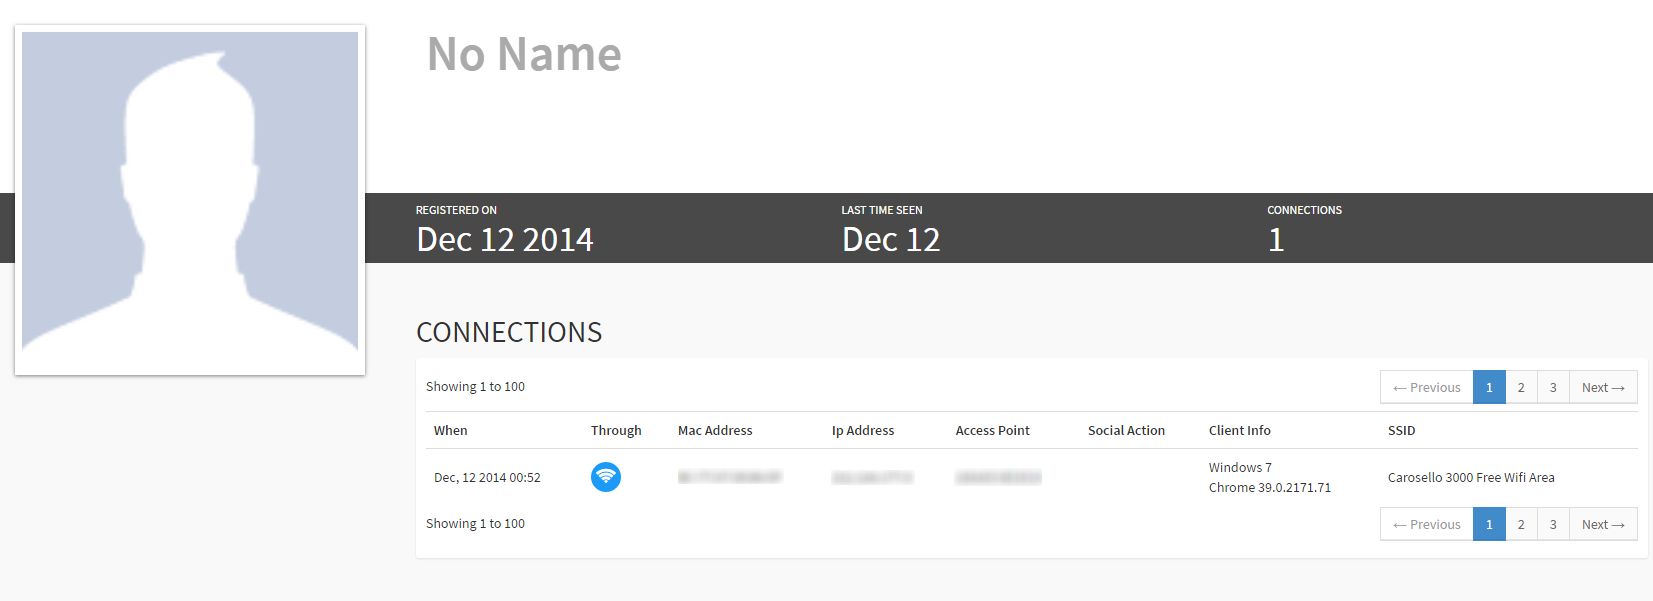
In general, network administrators cannot see the list of users connected to their network in real-time. Instead, Tanaza allows network admins to see the list of connected clients from anywhere, anytime, through a web dashboard, cloud.tanaza.com. Specifically, they see real-time users connected and authenticated (or even in the process of authenticating) through their cloud.tanaza.com management platform. Also, they see the historical data from all authenticated users, together with their personal information, in the Tanaza Analytics Dashboard. The screenshots below show how data about users and connections are viewed on the management platform of the Tanaza Analytics Dashboard.
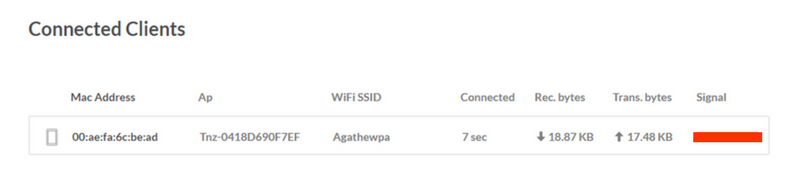
Why does it matter? This twofold kind of information helps you to understand better how the user authentication process to your Wi-Fi network works and the source of some related issues. For instance, visualizing a client in the list of connected clients on the Tanaza Cloud Platform, but not on the analytics dashboard, allows you to know that that user is in the process of authenticating, but didn’t provide his credentials to access Internet yet. Also, Tanaza can help you to detect potential network issues. The following screenshot shows an example of a connected client: here you can see the signal strength. If this element is red, for instance, it means that the user may have problems in reaching your captive portal due to a weak wireless signal, or that he may experience slow WiFi. The best choice in this case is to add one more access point to your network, in order to provide a stronger signal.
When you configure a click-through login page for user registration, clients authenticate to your network by simply clicking on a button, without providing any personal data. In this case, the authentication process starts once users click on the button and are redirected to the captive portal before accessing the Internet. When the cloud receives users’ request, it notifies the access point of the network that users have authenticated. Now, the access point clears away the captive portal on clients’ devices, and users can fully access Internet. The screenshot below shows how connected clients appear on the Tanaza dashboard: compared to the previous example, you can see more information about clients, as they have successfully authenticated on the captive portal, although in this case no personal data is available. Read this article to know how the Tanaza Analytics Dashboard works.
Typical use case: the click-through login method is favored by companies with an advertising-based business model, which value clicks for their ads and do not need any other personal data the clientele. Usually, network admins add videos, ads and banners on the login page, so as to further emphasise and advertise their products on the captive portal.
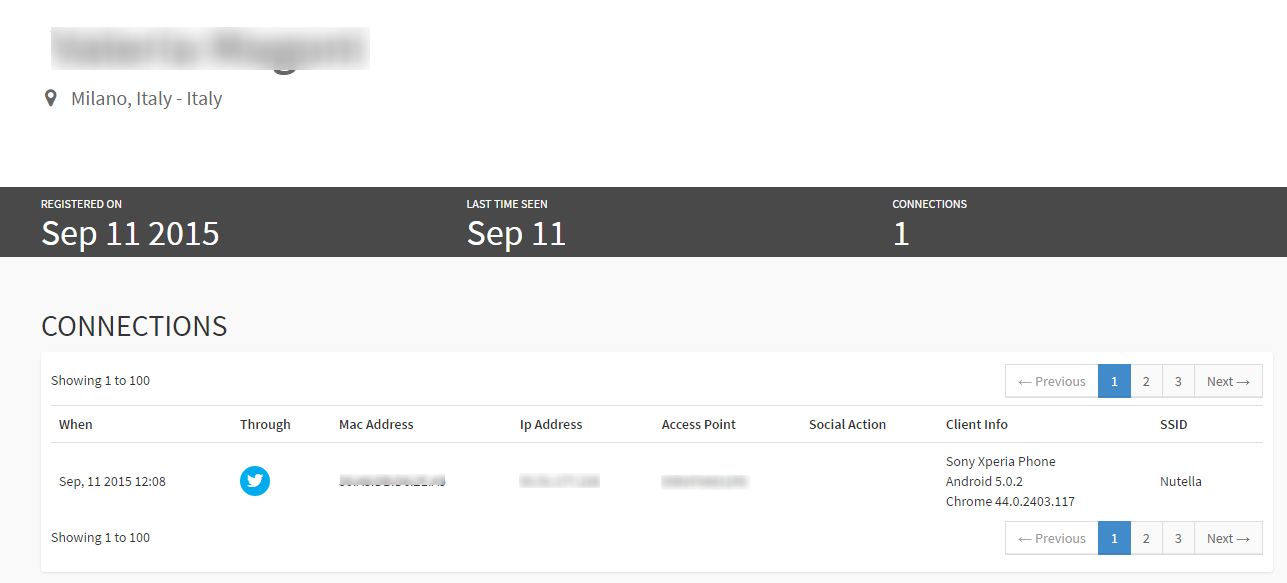
Other login methods: social login
Tanaza features a broad range of authentication methods within its captive portal, i.e. access through email or phone, voucher-based authentication, registration by filling a form and authentication using social networks, aka social login. Lately, the extensive use of social media among people led to the spread of social login among the different user login methods adopted by businesses. In this way, users can connect to an SSID using Facebook, Twitter, Instagram, Linkedin, etc. In this case, user authentication is completed when the login flow through social networks ends, meaning when the user accepts the terms and conditions requested by the social network, i.e. Facebook. The cloud then receives the user device’s request and notifies the access point of the network that the client has authenticated. At this point, full network access is granted. The following screenshot shows the Tanaza dashboard containing a connected client, who authenticated through the social login provided by Tanaza using his Twitter account.
Typical use case: any business whose goal is to boost its social visibility and increase its brand awareness leveraging the power of social media. A bar, for instance, could ask its visitors to like its Facebook page or to share their position to gain more visibility among other Facebook users. Also, a well-working wifi enhances the possibilities to gain positive reviews about your business on websites like TripAdvisor and Yelp. Read these instructions to learn how to setup a Tanaza built-in login page with social login.
How to track performance of video advertisements in the Wi-Fi login page
Nowadays, having a YouTube channel for a company is an interesting tool to be attractive and get higher visibility on the internet. The video content can be really diversified: tutorial, demonstration, presentation of a new product, event promotion, presentation of your company etc. Tanaza allows you to add YouTube videos to your login page, for advertising or promotions. To analyse the performance or your video, you advise you to use the YouTube Analytics tool (or your Vimeo Analytics) together with the Tanaza analytics dashboard.
THE YOUTUBE ANALYTICS TOOL
The objective of the YouTube Analytics is to monitor the results of your videos, overtime and real-time.
You can decide whether to have an overview of your YouTube channel…
… or to see details about one specific video.
Each report includes metrics like the watched time, the average duration of a video view, the number of views you had, the audience retention, the traffic sources, the engagement reports, the video’s likes and dislikes, the location from where people watched your videos and much more.
Two interesting metrics are the “Average percentage seen” which is how much of my video people see (did people see 25%,50%, or 99% of your video?) and the “Average view duration“, given in seconds.
These two metrics make you understand if people are interested about your video or not. With Tanaza, you can set a minimum duration in seconds and the user will not be allowed to skip the video until the countdown ends.
YouTube Analytics is full of data that bring you insights about your clientele. Other metrics that might be interesting for your business are:
Geography (if your video is available only to Wi-Fi users, it’s not relevant; instead, if you publicly host the video on Youtube this is relevant because shows the countries with a most engaged audience
Demographics of your audience (available only if the video had a lot of views)
Playback locations: you can see if your views come from the Youtube portal or from an embedded player (for example, the Youtube video that you embedded in Tanaza Splash Page)
Devices: segment users by device (computer, mobile phone or tablet) and operating system
Absolute and relative audience retention: see when users leave the video player and discover how you can improve your video
Channel’s analytics: analyze your general performance
WI-FI MARKETING, THE NEW TOOL FOR YOUR BUSINESS
By using Tanaza and YouTube video player and analytics, your Wi-Fi network becomes a powerful advertising tool.
Thanks to the data collected on your Tanaza dashboard, you will target the right people at the right moment with a contextual video advertisements by displaying videos on your login page.
Usually, people are willing to watch the video because they know that it is “the price to pay” to get free access to your Wi-Fi network. Moreover, if you well targeted your audience, they might be really interested about the video.
Wi-Fi is now more and more recognized as a marketing tool by companies because of its high ROI and its incomparable engagement rate.
Advertising products and services on your login page will bring you additional revenues, but you can also decide like some of our partners, to base your business model on the advertisement and to use the tools to measure results and prove the campaign effectiveness.
If you use Vimeo: Vimeo also has an analytic tool that allows you to get insight about who is watching your video and how many views you have. if you have a pro account, you will access the Vimeo analytics dashboard which give you access to a quick overview of your impression, plays, finishes, likes, comments, most popular videos etc.
You have the possibility to create and export custom reports.
HOW TO ADD A YOUTUBE VIDEO TO TANAZA SPLASH PAGE
Adding a video to Tanaza Splash Page is super-simple:
1) Copy the URL of the Youtube video or the Vimeo video.
2) Log in to your Cloud dashboard, choose the SSID and the Tanaza Splash Page you want to add the video to.
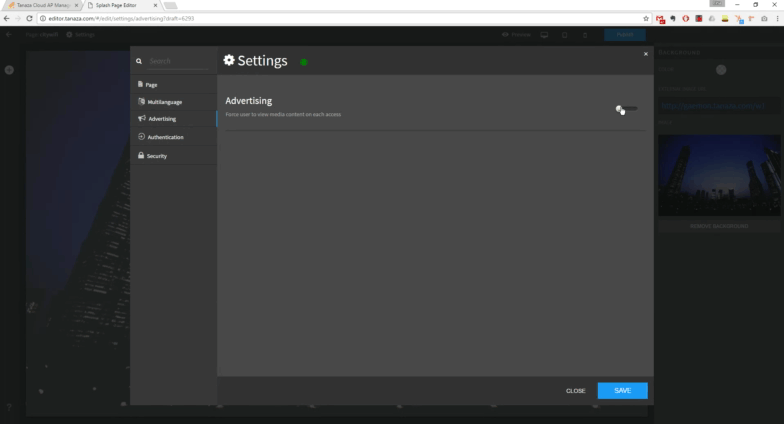
3) Once you have chosen the splash page you want to add the video advertisement to. Go to Setting > Advertising, check “Force view of a video on each access on the splash page”.
4) Select Video as your MEDIA TYPE. Paste the Youtube URL/s.
4) In this tab, you can also configure the duration of the video and its rotation (none, random or time-based).
We are using technical and profiling cookies to give you the best experience on our Website. By continuing to use our Website without changing the settings, you consent to our use of cookies. Read More about Cookies
Privacy & Cookies Policy
Privacy Overview
This website uses cookies to improve your experience while you navigate through the website. Out of these, the cookies that are categorized as necessary are stored on your browser as they are essential for the working of basic functionalities of the website. We also use third-party cookies that help us analyze and understand how you use this website. These cookies will be stored in your browser only with your consent. You also have the option to opt-out of these cookies. But opting out of some of these cookies may affect your browsing experience.
Necessary cookies are absolutely essential for the website to function properly. This category only includes cookies that ensures basic functionalities and security features of the website. These cookies do not store any personal information.
Any cookies that may not be particularly necessary for the website to function and is used specifically to collect user personal data via analytics, ads, other embedded contents are termed as non-necessary cookies. It is mandatory to procure user consent prior to running these cookies on your website.